
Modish Blog
-
EASY SUMMER ENTERTAINING MENULiving in the midwest and raising my...
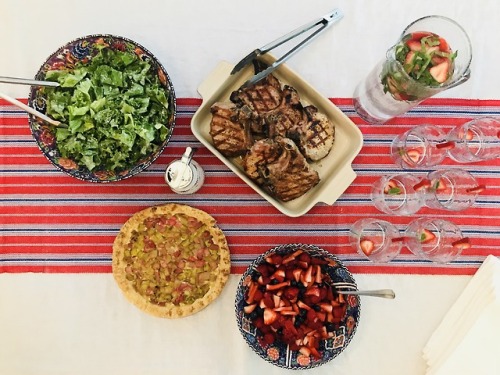
EASY SUMMER ENTERTAINING MENU
Living in the midwest and raising my sons here, I feel so lucky! I grew up near both set of my grandparents and was able to spend a lot of time with them throughout my childhood and into adulthood. Some of my favorite memories with each of my grandmothers took place in the kitchen.
My paternal grandmother was the head of the salad department at Luther College for part of my childhood. Even if we made a simple tuna melt at her house for lunch, we had to build a cute little lemon fish to garnish the serving plate! She loved being “the hostess with the mostest!”
My maternal grandmother was a pork farmer with the most beautiful garden and apple tree; at her house, I learned to cook with fresh, whole foods. I did a lot of baking in her kitchen for my grandpa and uncles and think I perfected her homemade pie crust and apple pie at age 10.
And as an adult, I would say cooking brings me much joy; I would even say it’s one of my most calming hobbies. BUT, I don’t think we have to be slaves to the kitchen (or grill) to put out a great meal! So, without further ado, I present an easy entertaining (or weeknight) menu that tastes like my childhood!
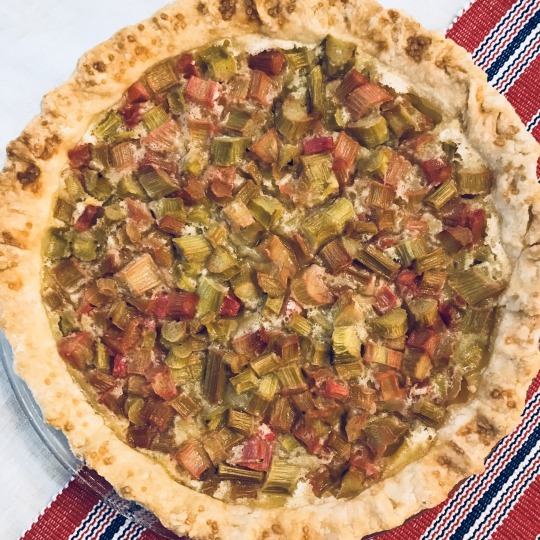
Rhubarb Pie
As a kid, my brothers and I used to take a bowl of sugar out to the rhubarb patch, pick a piece of rhubarb, dip the broken end into the bowl and eat. (Yes, we all double dipped into that bowl…) I grew up using it in jams and muffins and bars, but my mother-in-law gave me her mom’s pie recipe and the rest is history. I combined her filling with my grandma’s crust and just WOW.
This is by far the most labor intensive of the recipes, so make it ahead of time–like the day before! I promise, it’s SO WORTH IT!
If you feel like cheating time, you can use a frozen crust. It won’t be the same, but I won’t judge. I’ve done it, too. (Sorry, Grandma Joan!)
Grandma Joan’s Pie Crust
3 c. flour
1 c. lard (No skimping, use the real stuff and thank a pork farmer!)
1 beaten egg
8 T. VERY COLD water (ice)
1 T. vinegar
This will require one large bowl and two smaller bowls and a pastry cutter or two forks. (This recipe makes enough crust for two full pies, top and bottom crust. It freezes well.)
Tip: When working the pastry dough, work quickly. Keeping everything cold will ensure a perfect, flakey crust.
First, measure out 1 cup of lard; piece it out into tablespoon sizes on parchment paper and stick it in the freezer.
Then, fill one of the small bowls with water and ice. In the second small bowl, crack the egg and beat it. Add the vinegar.
Put the flour to the large bowl. Take the lard from the freezer and place the pieces into the flour. Use the pastry cutter or two forks to mix and break the lard into evenly dispersed, pea sized pieces throughout the flour.

Measure 8T. of the ice water into the egg/vinegar bowl. Mix.
Make a well in the flour mixture and add the wet ingredients. Use your hands to mix until just combined. (Do not over knead, it will make the crust tough.) Divide the dough into four parts and make discs. Feel free to wrap and freeze extras, this will only require one! (Or, roll it out, brush butter on it and sprinkle with cinnamon-sugar and bake at 350* for about 15 minutes. My boys LOVED that for a treat!)
Flour a hard surface. Place the disc on the surface and begin rolling. Be sure to turn the crust, so it doesn’t stick. When it’s rolled out to 1/8-¼ inch, gently fold it in half and then quarter and place it in a pie dish. Unfold to cover the bottom of the dish. Trim the sides of the crust about ¾ inch wider than the dish and fold them under the crust. Use your fingers or a fork to shape the edges of the crust.
Place the pie plate of crust onto a baking sheet for stability.
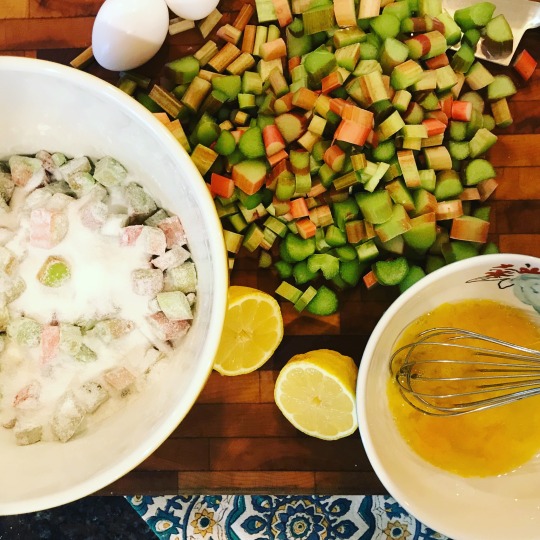
Grandma Angie’s Rhubarb Pie Filling:
2 ½ c. raw rhubarb, cut into 1 inch lengths
1 ½ c. sugar
¼ c. flour
2 slightly beaten eggs
2 T. lemon juice
dash of salt
(Plus 2 teaspoons of butter for later)
Preheat the oven to 425*
In a large bowl, slightly beat the eggs. Add all other ingredients, except the butter. Pour into a raw pie crust. Cut the butter into 6-8 pieces and dot the top of the filling with it. Sprinkle a little sugar on top. Bake for 10 minutes at 425*, then reduce the heat to 350* and bake for 30-40 minutes. Remove from the oven when the center of the pie is set and cool.
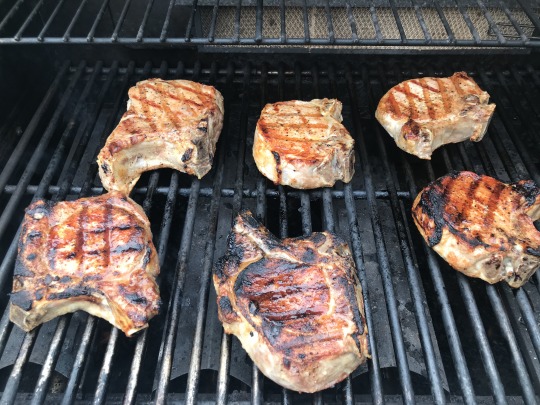
Grilled Pork Chops
I mentioned having grandparents that were pork farmers, didn’t I? For great grilled chops, I love using 1 inch thick bone-in chops, the little bit of fat will render while cooking, making them juicy and I think the bone gives them a bit more flavor.
This is where the USDA will be after me: I usually set them on the counter about an hour before I grill them. I find that they cook more evenly when they aren’t as cold as my refrigerator. Simply season them with a bit of seasoning salt and a generous portion of cracked black pepper when you pull them out of the fridge and let them bask in the most simple of flavors.
About 15-20 minutes before you’re ready to serve dinner, make sure your grill is at a moderate heat. (between 350-375* for a gas grill) High temps will dry out pork. Place the chop on the grill, after 2-3 minutes, give it a half turn on the same side for perfect grill marks. After another 2 minutes or so, flip it over and repeat the grill mark turning process. The entire grilling time should be around 10 minutes in total. Remove the chops from the grill and cover with a foil tent.
Let the chops rest 5-10 minutes under the foil tent for the juices to settle before serving.
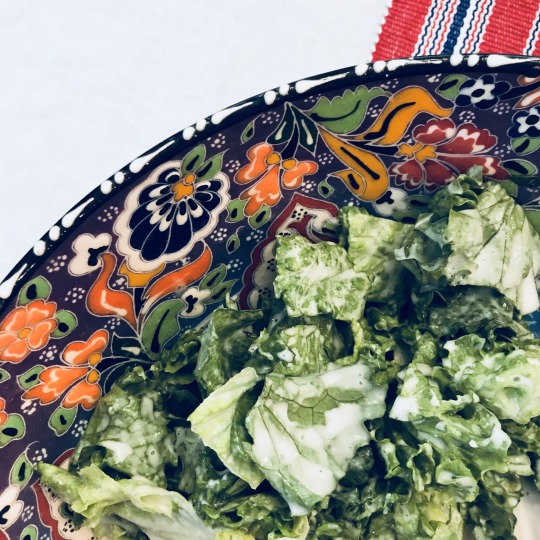
Summer Salad
I’m not sure if this a midwestern recipe, but both my husband and I grew up eating this simple salad. It just tastes like summer to me! We always made it with fresh leaf lettuce from the garden, but I’m a brown thumb. So, we buy fresh lettuce from a local grower at our local co-op and do our part to keep the local economy going! (EASY!) Fill a beautiful bowl with your washed leaf lettuce, cover and keep it in the fridge until you’re ready to serve.
Sour Cream Dressing
1 c. sour cream
¾ c. sugar
¼ c. vegetable oil (this doesn’t taste good with olive oil, trust me)
¼ c. white vinegar
½ t. salt
2 T. grated onion
Seriously, all you need to do is put these ingredients into your blender and mix. When the onion is blended and the dressing is smooth, transfer it to a pretty container. (This keeps for about one week refrigerated, as long as it’s covered and you can give it a good shake to remix!)
Right before serving, dress the greens and toss to coat evenly. (I use tongs) Serve!
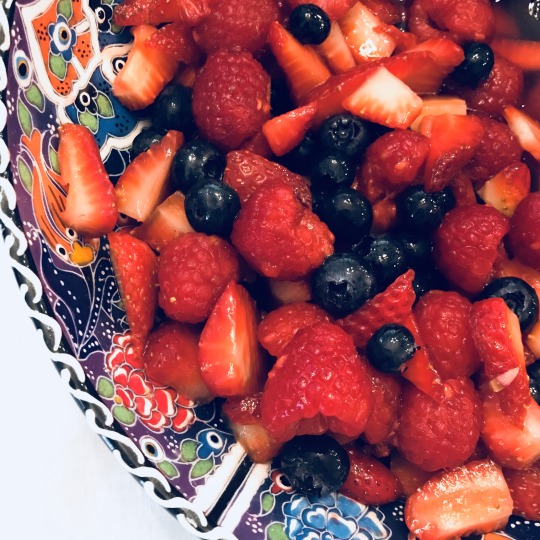
Macerated Berries
Berries taste like summer to me, too. This easy and fresh side dish can be made earlier in the day and pulled out of the fridge when you’re ready to serve.
2 c. sliced strawberries
2 c. blueberries
1 c. raspberries
¼ c. sugar
zest of one lemon

Wash the berries, slice the strawberries and place into a pretty bowl. In a small bowl, mix the sugar and lemon zest. Add the lemon sugar to the berries and fold them gently to coat. Let this rest covered in the refrigerator until you’re ready to serve. Trust me, the lemon adds just a little something special to the fruit to make it taste fancy with very little effort!
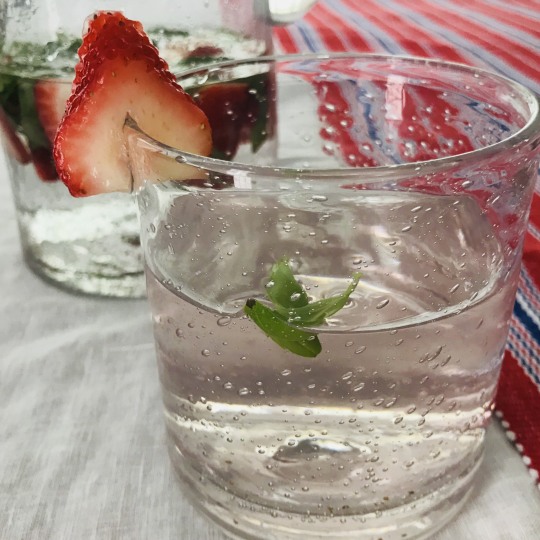
Strawberry Basil Water
Water
1c. Strawberries
½ c. Basil
This simple recipe is the perfect blend of subtle sweet and spice. Fill a glass pitcher with water; add berries and basil. (My basil leaves were large, so I chose to chiffonade them today. You can use smaller leaves whole.) Tastes best served at room temperature.